
How to build a rally car
Over the years I’ve heard plenty of reasons why buying a used rally car is a great idea. Certainly it can save a lot of time if you pick the right one. If you get it wrong, you could end up needing to fully rebuild it. Sometimes the best option is to build a car.
In part 5 of this series we covered what type of car to buy and why. You can click here to find out more. Having settled what car is best as your first one, let’s move on to building it.
Budget
The all important dollars have to come first. Work out what your total budget for the build is and then work backwards.
Example:
Total Budget: $10k
Roll Cage: $3k
Suspension: $3k
Seats, harnesses, intercom, rally computer: $2k
Tyres & Wheels: $1k
Car purchase: $500
Misc items (mud flaps, mechanical repairs etc) $500
This is an example only and there could be plenty of other things to consider. It helps to get quotes on as many items as possible to give you an accurate idea of costs. Once you know your fixed prices, you’ll know if you have extra to spend on other areas. There are three places you should not scrimp on. 1.) Safety, 2.) Suspension & 3.) Brakes. Items such as seats & harnesses should be bought through a reputable outlet. Second hand items may have been involved in an accident or may be damaged. Take extreme care if buying off the internet from Gumtree, Craigs List or Ebay even if they are listed as brand new. There are a lot of cheap counterfeit copies out there which will fail in an accident. It’s not worth the life of your co-driver or yourself to save a few dollars.
Tools & Skills
You’re going to need to know a few skills and have a few tools too. A good set of mechanical tools is a great start. You’ll also need some power tools such as a drill and an angle grinder and access to a welder. The best welder is a Mig with gas shielding. You’ll also need to know how to use the tools and be able to competently weld. Building a rally car is not the time to learn welding skills. Some air tools like an air chisel and a spray gun do help if you have a compressor.
Car
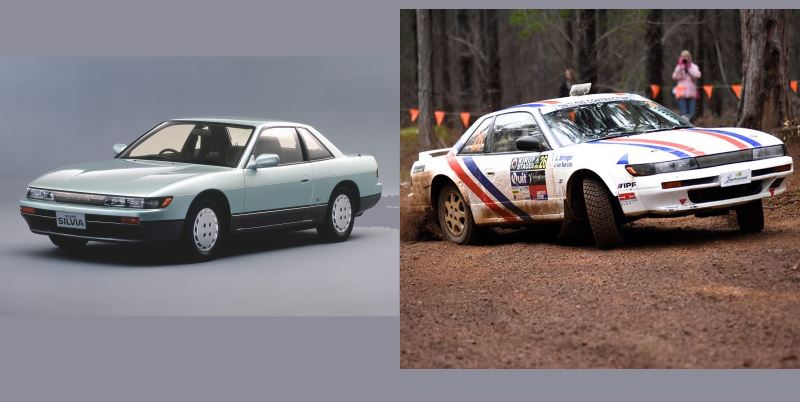
Depending on your skills and budget will depend on what type of car you buy to start with. Maybe a car requiring some mechanical work or panel repairs will be fine for you which may reduce the purchase price. You may be lucky and find a car or rolling shell that is partially completed as we did when building a Nissan Silvia
Strip interior
The first task is to strip the interior out of the car. Seats, carpets, roof lining, trims etc. The roll cage design and type will dictate whether you need to remove the dash or not. Take care removing parts. Certain items such as door trims and rear kick panels often need to be installed to comply with regulations. Other parts may be able to be sold if in good condition. Keep all of the bolts, nuts, screws and other fixings. Many of these can be re-used in other areas.
Remove sound deadening
Now comes the start of the noisy and dirty work. Remove all the sound deadening foam and felt from the floor and firewall. Remove all the tar from the floor. We find an air chisel works well to lift the tar up, however you have to be careful not to dig the chisel into the floor or seams otherwise you’ll create more welding for yourself. Also carefully clean and retain all floor bungs, both metal and rubber. To make it easier to remove the tar, do the job when it is cool. The tar will lift in larger sheets with less effort. The other way is to use dry ice. Apply some ice to the tar for a short while causing it to cool rapidly. Tap the tar with a hammer and it will crack and shatter making it easy to lift. Wear proper safety gear and if using dry ice, have plenty of ventilation. Often once the larger pieces have been lifted, the floor still has a lot of residue on it. Plenty of ventilation, and wiping the floor with old rags soaked in petrol will remove the rest.
Out with the driveline
Even though you may not be planning on rebuilding the engine or transmission, it is worth pulling out the driveline. This will aid with the next step and also allow a thorough inspection of all parts. Some bolts, nuts and splines can become sticky or seized. Getting them sorted now will make it much easier if a part needs to be replaced at a rally. You almost always find worn bushes that were hidden as well.
Seam Welding
Most manufacturers will apply a bead of sealant between panels and then spot weld them together. This is perfectly sufficient to last the life of a car during normal road going activities. This method is cheap and fast, however not strong enough for rally cars. The stresses of racing on gravel roads can cause seams to pop or split open. The car will also flex meaning that suspension will not do its job properly, causing traction and handling problems. The solution is to seam weld. The process involves stitch welding crucial seams to increase strength and structural rigidity. Generally seam welding is performed at suspension mounting points, cross members and structural areas where loads are highest.
Prep
Clean up seams with an angle grinder with a cup type wire brush. For wider or deeper seams you may need to use a screwdriver or pick to dig out the sealant. You may need to wash and degrease the engine bay first. Try to remove as much paint and sealant as you can to give good contact. It is not necessary to clean up the entire length of each seam. You only need to clean up where you are welding. Generally a weld will be 25mm long with 25mm spacing between each weld. Note where any brake or fuel lines are, remove where necessary. Ensure there are no sources of ignition like open fuel tanks, fuel filters, grease or oil.
Welding
Make sure you have good ventilation, a handy supply of water and all the safety gear. Even with the visible sealant removed, there is still some in the seam that will emit fumes. Stitch weld as required. Be aware that whilst welding on one side, the heat penetration can cause tar and paint on the other side of a panel to ignite or smoulder so stop regularly to check. Also position and weld in seat mounting bars at the same time.
Roll cage
This is the most important part of the whole build. Check with the regulations in your area to confirm what type of roll cage you need. You may be able to use a bolt in roll cage with minimal bar work or you may need a full international spec weld in cage. Some of the popular cars do have weld in and bolt in kits available, others will need a custom cage. If you do need a custom cage, you’re better off fitting a full front suspension tower to rear suspension tower weld in. If the cage is weld in, it will be installed now.
Sealing
Once you have all your welding complete vacuum out the interior thoroughly and wipe over with wax & grease remover. Time to seal all the seams. Use proper seam sealant or Sikaflex and apply with a caulking gun. Don’t use silicone based products as they tend not to seal well and are not ideal to paint over. Give all seams a good bead, including where a weld in cage meets the floor. Also seal any holes that open to underneath the car or through the firewall. Any floor bungs can be glued back into place with a generous bead of sealant as well.
Interior Painting
You can choose to spray or hand plaint. We use a neutral colour these days unless the customer is specific about the interior and exterior matching. A silver coloured single pack rust preventative paint is applied. This choice of colour and paint type makes it easy to touch up and will match any external colour if the car is later resprayed. All of the external welds, underneath the floor pan and engine bay can be painted or touched up now too.
Bolt in cage
A bolt in cage can go in now. The trick is to get all the bars in and loosely assemble. Once you have everything in the correct position, you can mark the holes for bolting to the floor. You may need to remove the cage to drill the holes. Get all of the couplings lined up and the bolts in finger tight. Make sure you have the load plates under the car before tightening all the floor bolts. Also fit the floor bolts so they are inserted with the lock nuts inside the car to prevent damage. Follow the manufacturer’s instructions for tightening sequence and bolt torques. If bolts passing through tubes are over tightened they can deform the tubes damaging the cage.
Mechanical work
Before putting the engine and driveline back in the car, you can tend to any mechanical items. Belts (such as cam belt if fitted), gaskets, seals and hoses can be replaced. It’s also worth giving the engine a good service including new filters. If the car is fuel injected, a new fuel pump is another worthwhile replacement. We will fit a new clutch at this stage too.
Driveline back in
This is the opportunity to fit any new bushes to sub frame mounts, new engine/transmission mounts and any other bushes that may need replacing. Give all bolt shanks and any splines a coat of grease when re-assembling. For the time being we re-install the standard suspension units (springs and dampers) to make the car mobile and for mounting brakes etc.
Brakes
It will depend on the car as to the type of brake set up that is used. During the build we will generally upgrade brakes. If rear drum brakes are fitted, now is the opportunity to fit rear discs if possible. ABS should be removed from the brake circuit, even if the ABS unit has to remain in the car. Some rally cars simply need all of the brake lines reconnected and parts replaced as required. Other cars need all the components upgraded and a complete re-plumb. If we are re-plumbing the brakes we use stainless steel braided brakes hoses and fit a hydraulic handbrake and bias valve. Brake lines will also be run in board to reduce the chance of damage. All lines and fittings need to be thoroughly checked and re-checked during bleeding to make sure there are no leaks.
Internal fittings
The dash (if removed), seats, fire extinguishers, spare wheel & jack mounts can all go in. You may also need to cut reliefs into door trims and the dash to allow them to clear the bars in the roll cage. Everything needs to be mounted safely and securely. Use high tensile bolts to fix all of these items, it is often dictated in the rules that bolts must be used. This is only a couple of sentences, in reality there may be several days work of fabrication, drilling and mounting.
Electrics
We’ll usually tackle electrics before or at the same time as the other internal fittings. Sometimes a car will not need much wiring and other times it will need a complete strip and start again. Sometimes the roll cage will force a relocation of the wiring loom and/or fuse box too. Any new circuits that are added such as additional lights, rally computer, intercom, map reading light etc all need to be safely wired and must be fused correctly. We often find electrics is the area where most mistakes are made. Test all of the electrics and fire up the engine.
Under body protection
A sump guard and mounts is now on the list along with any other stone deflectors or molded floor protection. Most rally cars also need a fuel tank guard too. NB: If the fuel tank, pump and/or fuel filter is mounted in the boot, there must be a fuel proof firewall installed between the boot and the passenger compartment. Some popular rally cars you can buy all of the protection off the shelf, other cars it all has to be custom made. We use sprung 4mm aluminium sheet for sump guards, kevlar/carbon fibre for molded sections and HDPE sheet for deflectors and tank guards.
Keeping cool & secure
With everything completed under the car, we fit bonnet/boot pins and a roof vent next. With some care, these items can be installed without damage to the surrounding paint work. A step drill helps with the bonnet pins and drilling clearance holes. We use a nibbler to cut out the roof vent hole as it makes a neat job. To catch the swarf, a sheet of newspaper is carefully taped to the inside of the roof. Sikaflex is used to seal the roof vent in place before bolting down.
Body work
It’s about 50/50 as to whether we need to give a car a coat of paint during a build. Some cars have pretty bad paint when we start, others are pristine. The colour and type of paint is up to you. Any 2 pack paint should be applied in a proper spray booth due to the nasty chemicals in it. Another option is to vinyl wrap the car. We have seen this done successfully on several rally cars. If you paint the car, ensure you get a very good coat of wax over it before applying any stickers to the body work.
Rally Suspension
We fit the rally suspension as one of the last items to make sure we don’t get any paint on it. In most cases the standard units are removed and the rally units bolted in. Any adjustable parts such as camber/castor arms are also fitted at this time. Before competition, the car may require ride height adjustment and will definitely need a detailed wheel alignment.
Mud Flaps
The car has to be set to the correct ride height and have rally tyres fitted to get the mud flaps right. There are rules regarding width and mudflap to ground clearance. We drop the car onto its wheels and then create cardboard templates that follow the profile of the body work and inner arches as required. Usually you only need one template for the front and one template for the rear. Once we are happy the cardboard templates are correct, we’ll trace them onto either HDPE or urethane sheet and cut out two sets. One set will go on the car, the other as spares. We rivet mud flap brackets to the body work and cable tie the flaps in place.
Last items
Race harnesses, helmet hammock, first aid kit and reflective triangles go in now. We may also fit additional lights or make up a light pod.
Building a rally car does require some time and effort. If you don’t have all the necessary equipment and skills, you will need to find someone to help or maybe pay to have certain work done. The best thing about it is you know what has gone into it and you have a lot of choice over the specs. For more info on some of the cars we’ve built, check out our car builds threads here.
Karl Drummond


